Installing Pistons in Cylinders with an Exhaust Bridge
by Wiseco Performance Products
Originally printed in issue #78 of Still....Keeping Track
Find out how to relieve an exhaust bridge and drill lubrication holes in 2 stroke applications, so you can get the most out of your piston!
When you order a new Wiseco 2-stroke piston and open up the box and read the instructions, you might see something like “follow these steps to drill the lubrication holes.” There’s no doubt that the thought of drilling holes in your new piston can be scary and intimidating. But not to worry! We’ll get you through it right here with all the information you need and a step-by-step. Relieving the exhaust bridge and drilling lubrication holes is a common part of the 2-stroke top end replacement process, but the importance of performing these steps is unrealized by many and neglected too often.
So, what is an exhaust bridge?
First things first, not all 2-stroke cylinders have an exhaust bridge. So if your cylinder does not have one, drilling holes in your piston is not necessary.
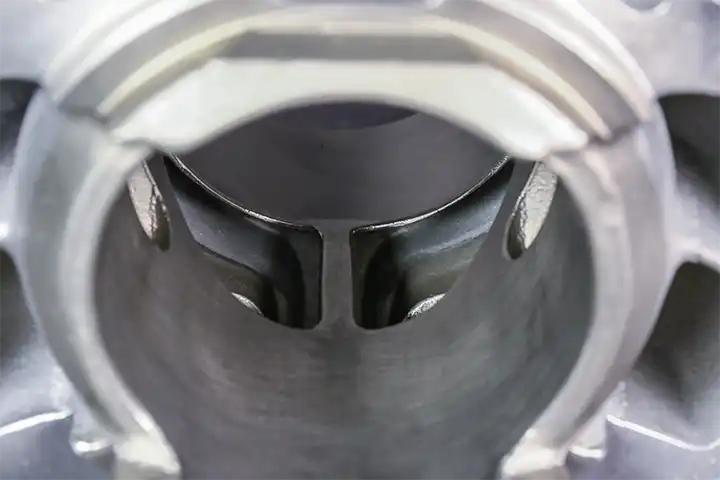
The exhaust bridge is the thin strip of metal that separates the exhaust ports in the cylinder. Whether you look into the exhaust ports through the exhaust outlet or through the cylinder bore, if you see a thin metal wall separating your exhaust ports, that is your exhaust bridge. For the purpose of installing a new Wiseco piston, the area of concern is the edge of the exhaust bridge on the inside of the cylinder bore.
The exhaust bridge is the edge of the wall separating the exhaust ports on some 2 stroke cylinders.
Why do I need to relieve the exhaust bridge?
Now that we know what the exhaust bridge is, it’s important to understand why we feel this machine work is essential to replacing a 2-stroke top end. The most heat in your motor is generated from combustion in the cylinder during normal operation. Specifically, the exhaust port(s) of the cylinder are exposed to the most heat because this is the only way out for the hot gas produced during combustion.
This means that under normal running conditions, your piston and your exhaust bridge are constantly under the pressure of extreme heat.
Wiseco pistons are made from forged aluminum, which offers more strength and reliability, but also expands faster under heat than an OEM cast piston. The exhaust bridge will also expand more than the rest of the cylinder because it is such a thin structure. The lack of material makes it harder for heat to dissipate before it affects the aluminum and causes expansion.
Expansion under heat is normal, but must be compensated for to make sure you get the most life and best performance out of your top end. Relieving the exhaust bridge simply means taking a small amount of material off the face the bridge in order to make room for expansion. If there was no extra tolerance, the exhaust bridge would expand past the cylinder wall once your motor heats up. This leads to scoring on the piston as it comes into contact with the exhaust bridge, especially as the piston expands at the same time.
Relieving the Exhaust Bridge
Now that we have some understanding established, let’s go through how to get it done. As always, if you don’t feel comfortable doing this work, this can commonly be done by the shop performing your cylinder work. If you have the rights tools, this can be done in the garage on cast iron and steel cylinder bore liners. We recommend using a die grinder with a small sanding roll to gently remove 0.003” of material off the cylinder wall face of the exhaust bridge.
After the material is removed, the machining must be blended with the rest of the cylinder wall at the top and bottom of the exhaust bridge. You want to make sure there’s an easy slope for the piston ring to slide over when entering and exiting the exhaust bridge relief. If your cylinder is lined with Nikasil, this process will not work because that material is too hard. Your exhaust bridge must be relieved before being lined with Nikasil to achieve the same result. Check with the shop you choose for your cylinder work if you are unsure.
Why do I need to drill holes in my piston?
Relieving the exhaust bridge will make sure there’s no expansion past the cylinder wall, but we still want to make sure we keep the heat as low as possible. With small holes drilled into the skirt of the piston, oil underneath the piston will makes its way through the holes, and lubricate the contact point between the piston and exhaust bridge. Better lubrication means less friction, and less friction means less heat, which is what we want to make sure we don’t have any abnormal wear.
Drilling Lubrication Holes
Make sure you have the instruction sheet that came with your new piston. This drilling information can also be found there, complete with a visual diagram.
Be prepared with your instruction sheet.
- Install the piston and wrist pin on the connecting rod with one circlip. Make sure the arrow stamped on the dome of the piston is facing the exhaust side of the cylinder.
- Slide the cylinder over the piston until the cylinder is in its normal position on the crankcase.
- Slowly turn the engine over until the bottom ring groove (or the only ring groove if your piston has only one) on the piston is at the top of the exhaust bridge. You can look through the exhaust port of the cylinder to help know when the piston is in the correct spot.
- Go through the exhaust port with a pencil and trace a line on the piston skirt for each side of the exhaust bridge.
- Once the lines are traced and visible, remove the cylinder and the piston.
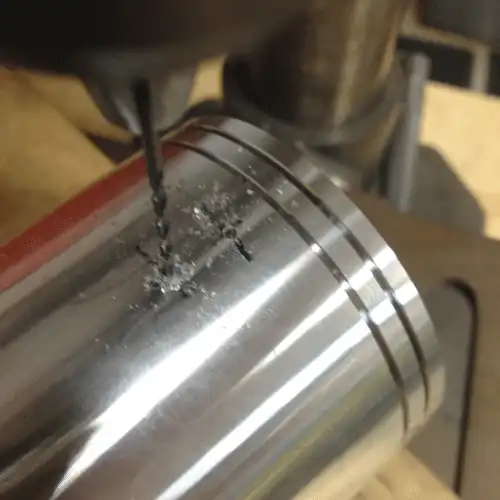
- Start 0.300” below the bottom ring groove and mark two points 0.375” apart from each other. Make sure the points are centered horizontally between the two lines you traced.
- Drill two holes 0.060” - 0.090” in diameter (1/16” or 5/64” drill bit) on your marked points (one hole on each point).
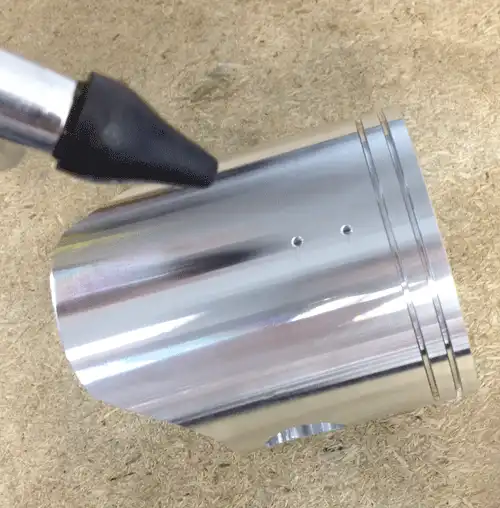
- Remove all burrs from drilling the lubrication holes. On the inside of the piston, lightly sand with 400-600 grit sand paper. On the outside of the piston, use a ¼” drill bit and twirl it between your fingers over the holes you drilled to break away any edges and imperfections.
- Wash the cylinder and piston with soap and water, and use compressed air to remove any water and debris.
- Wipe the cylinder wall with light coat of oil. Whichever 2- cycle oil you normally use is fine.
- Continue your top end rebuild as normal.