Simple Sachs Shift Selector Secrets
by Kip Kern
Originally printed in 1999 issue #5 of Still....Keeping Track

Al Buehner asked me to submit an article on the adjustment of Sachs 5 + 6 speed transmissions. What I wish to do is not quote "word for word" steps involved from shop manuals, but give some very important areas, I feel, to pay attention to when performing this task. By no means am I a professional, good common sense and a little reading can produce great results!
Step 1. Have a Sachs engine manual handy be it a Penton shop manual, Sachs repair instruction No. 336.8 E/4, or a Clymer service handbook M427. Follow the printed steps and you will be fine.
Step 2. Very good "things" to know!
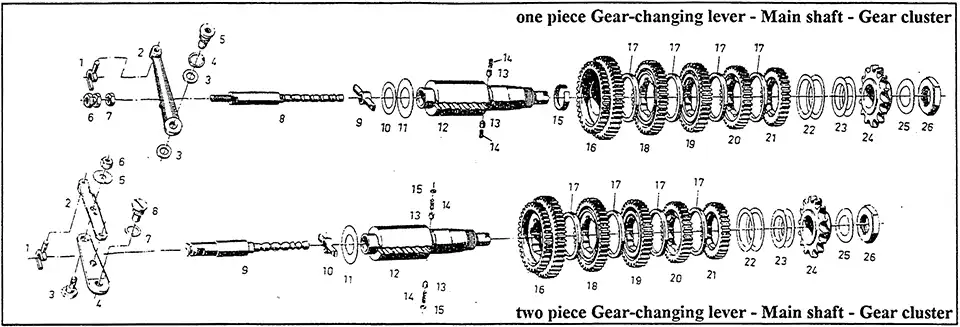
A. There are two types of gear selectors, a one piece, and a two piece. Adjustment procedures are different. Read carefully about the type of selector you will be adjusting.
B. I don't believe in the gear lock device; therefore, I don't use them, sorry!
C. Very Important! Before you can properly adjust any Sachs transmission, you must ensure the following:
- The main shaft (fig. 12) is shimmed properly between case halves.
- The shift key (fig. 9) is in excellent condition.
- The selector rod (fig. 8 & 9) is not worn.
- The selector rod detent cups and springs (fig. 13 & 14) are in excellent condition.
- The transmission gears are spaced properly and are not worn on the inside.
- The two springs on the shift boss are OK and that each flex properly.
- The shift boss is shimmed properly from the inside of the clutch case.
- The space between the shift boss and the clutch cover is shimmed properly, prior to placement of the clutch assembly.
- Properly shim the shift arm pivot point in the case.
- Use an unworn shift fork (fig. 1).
D. Don't worry about the stop bushing, eccentric cams, whatever, until transmission adjustment is complete.
E. Statically adjust the shift arms per instructions, rotate main shaft and run the transmission through the paces. If it shifts OK from 1-5 or 6, you have it! If not, adjust the arm to meet direction needed, i.e., 1 piece arm = rotate selector arm fork nut (fig. 6) in or out to achieve adjustment. 2 piece arm = turn eccentric screw on arm (fig. 3) to achieve adjustment. In either case you must be able to rotate the main shaft and run the shifting through all of the gears. Once done, shift to lowest gear, hold down on the shifter and adjust the cam stop and tighten. Next, shift to highest gear, hold up on the shift lever and adjust the cam stop and tighten. Now, after all is adjusted and checked tight, statically run the transmission through all of the gears again and ensure that it shifts OK from top to bottom. With luck, you won't have to readjust and you will be finished!
F. Handy tools to have to adjust transmissions:
- For 1 Piece arm= Depth Micrometer for .910-.915 measurement
- For 2 Piece arm= "thin" 13 and 10mm wrenches
As you can see from the above comments and your reading of the shop manuals, this is an easy task but always remember it is imperative that this engine and transmission be shimmed properly to function correctly!


