

KTM Clutches
by Bobby Lucas
Originally printed in 1999 issue #4 of Still....Keeping Track
Boy, one could write volumes on this subject alone but we will try to help the rider as much as possible here.
First you must identify which clutch system and motor you have. Hopefully your clutch is complete. Early clutches were made of brass and steel. Adjusted and maintained, it will last a couple of racing seasons. This is our goal!
Penton/KTM 125, 175, 250, & 400's throughout the years, all used different kinds and numbers of clutch plates and related parts. Check the table at the end of this article for help and check your parts manual before ordering parts or reassembling. Because of the number of these changes, generally no one way is correct.
My past experience is that engines left at rest for many years need only cleaning and inspection of parts. Pay close attention to your pressure plate, to the spring nuts, and bolts. Count the number of threads showing on the eight spring bolts as this applies pressure to the clutch and will be an area of adjustment at a later time.
Every Penton owner wants to ride A.S.A.P. and often the bike will start and run, but the bike dies or jumps and dies when the bike is put into gear. Draining the crank case and filling it with new oil helps sometimes. Warm up the engine, drain the oil, refill, and try again.
One should really examine the whole bike before riding. This is a pre run check. Use common sense. Check brake cams, cables, crank seals, and the crank bearings. Clean the ignition, air box, and carb. I'll stop about all this, it's really an article by itself1 NOTE: Clutch drag, more often than not is caused by worn clutch push rods and the 6mm ball bearing, or the pin at the cam. Holding the bike in gear with the engine running for extended periods causes the two rods and the ball to wear or worse, causes the pressure plate, rods, and ball to become one.
Working on your clutch is easy once you have some tips. First off, determine what is wrong. A slipping clutch is one without enough pressure. A 1/2 turn on the eight nuts can solve slipping, if the plates are worn. You can check your cable to see if it's properly adjusted at the engine and handlebar adjusters. You may need a new cable. If your cable checks out, one or all of your disengaging parts may need replacement.
Normally I've seen the 6mm ball flat on two sides and the rods pitted. Replace the ball and check again. If it works, your batting a thousand. If not, you can clean up the action by placing 2 6mm balls in the center and grind off each end of the rods to the appropriate amount. This is a grind and fit method. Don't take off too much!
The bearing cover and it's disengaging lever may be so worn that only a replacement will do. Buy all the spare parts and bikes you can. Use the late model clutch set-up if you can find it.
NOTE: Late model set-ups are easy to see on some engines. Look at the clutch engaging housing (bearing plate assy). The advantages are that your disengaging shaft rides in a steel sleeve vs the old type where your disengaging shaft rides on the case housing. The housing is soft and if not kept clean and greased, will cause severe wear, and improper clutch action is the result.
In 1976 and up, all engines used a single rod with the bearings on either the pressure plate (housing is old style) or bearings on the housing end of the rod with a cup type bearing activated by a pin via the disengaging shaft.
The fibre clutch plates are directional and must be installed so oil will sling out of the basket when you open your clutch.
Clutch engine cases also allow oil to leave the clutch at a better rate on late model clutches. Early silver motors had only one flute, later models have two. Original silver covers have none and could cause some clutch drag. Original black covers are cool to look at but hold so much oil that a slow action is almost always going to happen if every part isn't in top shape.
If you decide to mix a late model clutch to an early model case, use all the parts from the late model to include basket and pinion gear. Believe it or not, they are a matched set. Use a 250 on a 250, 400 on a 400 as the number of teeth match the transmission gears.
My price list dated 1975 prices the disengaging cover complete at $16.60. Now I'm sure it's going to cost you 5 times that today to buy a new one or about the same to have one rebuilt. Jack Penton asked me what we should do to rebuild them and it looks like we can if they aren't too far gone. I've got a large supply of bikes, so I've never rebuilt one, but my machinist says we can. You need to be able to fit all parts and if rebuilt, you can make the proper adjustments.
CLUTCH ADJUSTMENTS
As stated earlier, pay close attention to the eight nuts and spring bolts before you take . apart your clutch. You should know that the only time it is required to disassemble your clutch is when a repair into it is necessary. You may replace trans1mss1on gears and crank parts without taking your clutch apart. I always replace the two bearings #Din 625-16005-C SV41 when I intend to race the engine. This gives you a true running clutch on the main gear shaft.
Once you have tested gear shifting through all gears you are ready to assemble your clutch. Usually I install the cases in the frame at this point of a restoration. Install your cylinder and head, don't forget to drill your piston. Now assemble your clutch (see table and manuals for sequence of plates per your engine type).
Tighten the spring bolts in a crossing manner so as to keep pressure the same. You need to make a tool to use here. Use a 10mm deep socket and weld a large nut or wheel to the ratchet end, leaving a hole large enough to lip a screw driver through so you can hold the bolts and tum the nuts. This would be the same as the special tool #51-12-006-000.

NOTE: screwdriver end must fit the inside of clutch nut's center (see photo below)
Once you have your clutch plates installed, install the rods and bearing from the bearing cover side , always grease with molykotle paste, tighten nuts and bolts and check your distance measurement of the disengagement lever on the bearing plate - late models 44.5 to 45.5mm, early models 42.5 to 43.5mm (see photo below).
NOTE: Rounded end of the rod goes in first, then the 6mm ball, then the second rod, flat both ends.
Disengage the clutch and check the pressure plate to see that it lifts evenly. Install your clutch cable and adjust it to a good feel. Install your drive sprocket, chain, and rear wheel if they have not been installed already.
Take out your spark plug. Shift your transmission into a low gear. Pull your clutch lever to the handlebar and check that you have 1/2 inch off the bar and zip tie it in that position. Place your bike on a center stand (crate) and tum the rear wheel and observe the pressure plate. It must be true at all springs, nuts, and bolts or a hot spot in the clutch plates will occur and uneven wear of the plates will result. You may also set up a dial indicator to true the pressure plate.
Align the nuts on the clutch with the hole in the bolts in such a way that you can wire all eight nuts together in a circle using . 040 steel wire or use the stock pins size lxl5mm.
Cut your zip tie at the handle bar, install your kick starter, replace your spark plug and shift the bike back into neutral. With the kick starter, push the engine through. If your compression is up (new top end we hope) and the motor turns over, your in great shape.
FINAL TEST
Fill the transmission with oil and go for a ride. Some adjustment of the clutch cable may still be required, but not usually. The final test is under power and with clean solid shifts. The last test is to see if you can easily find neutral with the engine hot.
Now go win some races!
INSTALLATION SEQUENCE OF CLUTCH DISCS
To include Late 79 to 81 KTM's
Late Model clutches
125 - 175cc Beginning with an organic disc, you have to put in alternating 5 organic and 5 aluminum discs
250cc Enduro - Beginning with bottom ring, put in first steel disc and then alternating 7 sinter and 7 steel discs.
250cc MC - Beginning with 2 steel discs,
400cc - First put in the bottom ring, begin with the steel disc and alternate with 9 steel and 8 fibre or sinter discs.
Early Model clutches ( 1972 thru 1977)
250cc Hare Scrambler - 8 steel, 7 brass, 1 steel ring
175cc Jack Piner - 6 steel, 5 fiber, 1 steel ring
Thickness of clutch plates
125, 175, 250 MC - Clutch disc, organic 3.5mm
250 Enduro - clutch discs 2.5mm
400 MC/ Enduro clutch discs 2mm
Length of clutch springs
1.5mm diam x 40.5mm - 175
1.6mm diam x 38.5mm - 250
1.7mm diam x 37mm - 400
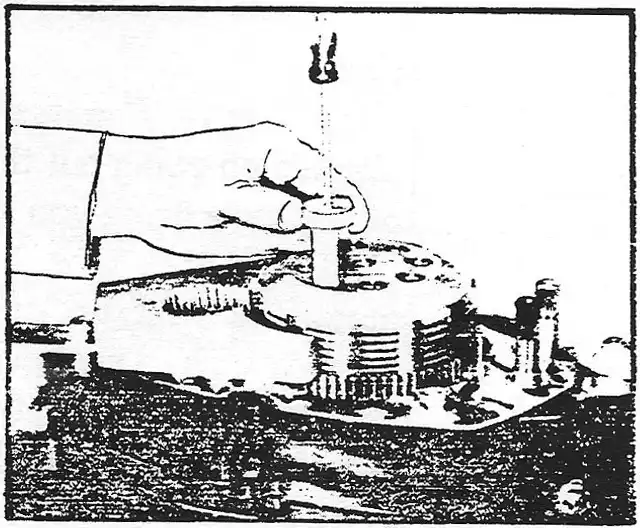
Photo showing how to use the special tool #51-12-06-000.
The screwdriver is used to keep the screws from turning. Turn the nut on the tool to tighten the clutch nuts till correct number of threads show, usually 3-4 threads
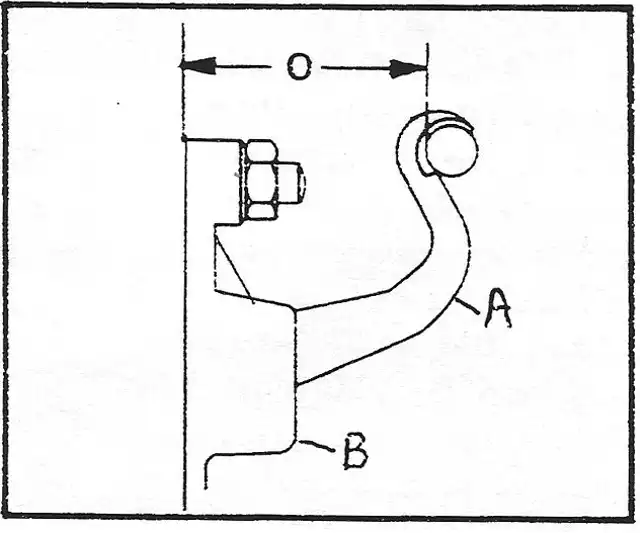
Photo showing the measurement of the disengagement lever (A) on the bearing plate (B)