How to set up a Winning Penton (Part 3)
Parts and Accessories
by Kent Knudson
Originally printed in the 2002 issue #17 of Still….Keeping Track
Now that we've outlined both the engine (Part I) and chassis (Part II) set up, it's time to address all of the remaining components that were used to build the Pentons that Kevin Brown and Gary Roach rode to their AHRMA National Championships. As I stated in Part II, we have tried very hard to retain the original components and overall appearance of the Penton motorcycle. All of the following components (except the tank) are readily available and the only modifications made to them were for added reliability or ease of maintenance.
I would like to thank Alan Buehner, Karl Schneider, Larry Perkins, Barry Higgins of H & H KTM, Robbie Jenks of Athens Sport Cycles, James Giddings of Giddings Machine Racing and, of course, Kevin Brown and Gary Roach for their input and assistance with these components.
HANDLEBARS - We've had good luck with the Renthal #666 (seriously!) 6" motocross bar, which is the tallest off-road bar Renthal America imports. Renthal handlebars are made in the UK with very high quality aluminum alloy that is strong yet resilient in a crash. Kevin has crash tested these bars repeatedly and we' re still on our original set!
CONTROLS - I originally purchased Magura split perch lever assemblies and a Magura 312 "side pull" throttle assembly from H & H KTM, but Magura USA has since stopped importing the 312 throttle assembly. Your options include using the Magura 314 throttle assembly (same as the 312 but with a plastic housing) for around $20 or you can have your KTM dealer order the 312 (it was used on older KTM 4-strokes) for around $80!
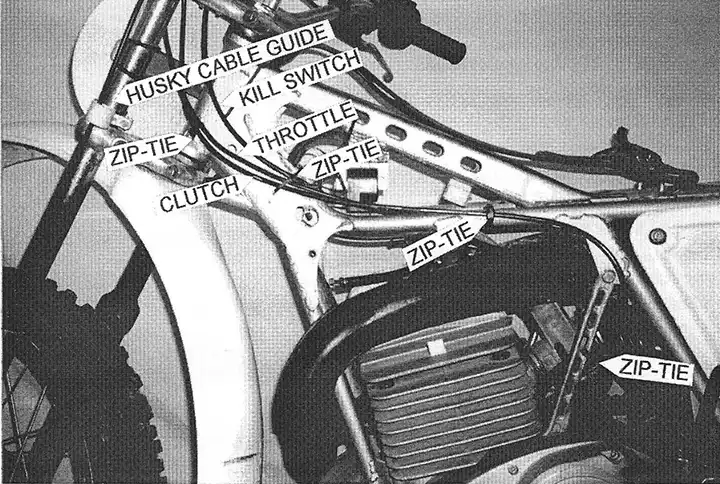
CABLES - The Terrycable clutch cable is from Alan Buehner and the Terrycable throttle cable that fits the Magura 312 throttle assembly and Bing Carburetor is from H & H KTM. The latest batch of Terrycable front brake cables has a funky adjustable clevis that I'm not too fond of, so I had Motion Pro make some front brake cables to my specs. I have also included a photo of our cable routing (see photo 1). I prefer to keep the cables loosely zip-tied to the bike at several locations to prevent excess movement or chafing.
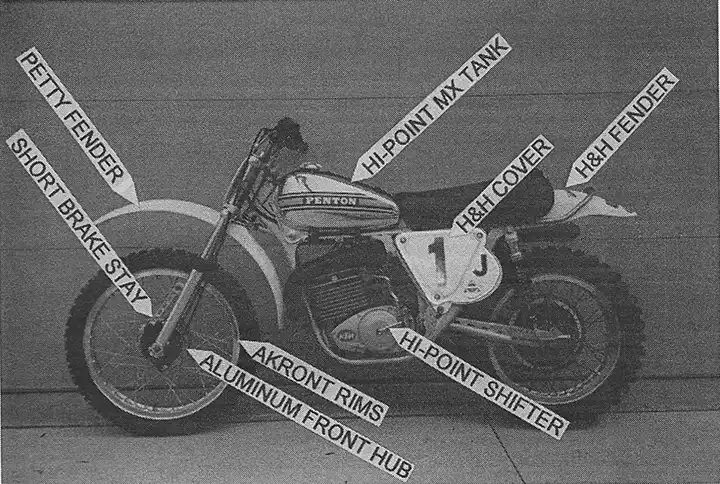
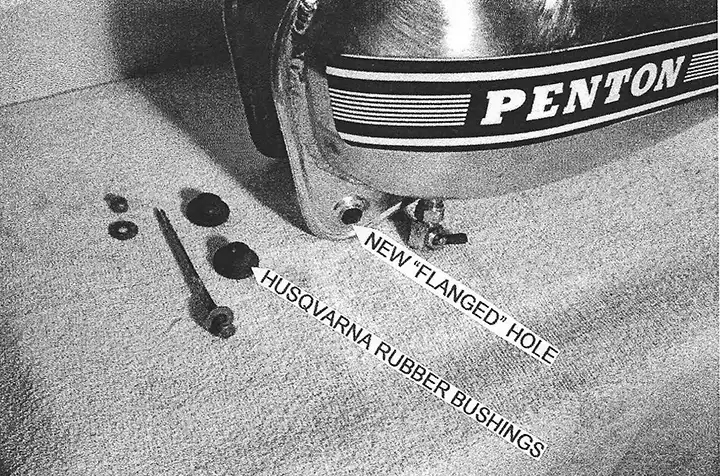
TANK - We use an original Hi-Point aluminum MX tank. The aluminum tank has proven to be very durable, as it dents but doesn't crack or break like the fiberglass tanks. It also eliminates any of the fuel compatibility issues some members have encountered with their fiberglass tanks. I heavily pad the underside of the tank at the front and rear to prevent any movement of the tank or contact with the frame. In conjunction with the leather strap, I also bolt the tank to the frame (ala Husqvarna) because we originally had trouble with the tank's mounting "ears" bending as the tank tried to move around during a race. To do this I first made a tool to punch a flanged hole in the tank. Then I used Husqvarna rubber tank bushings and a long 6mm bolt, washers and aircraft nut to hold the tank in place (see photo 2).
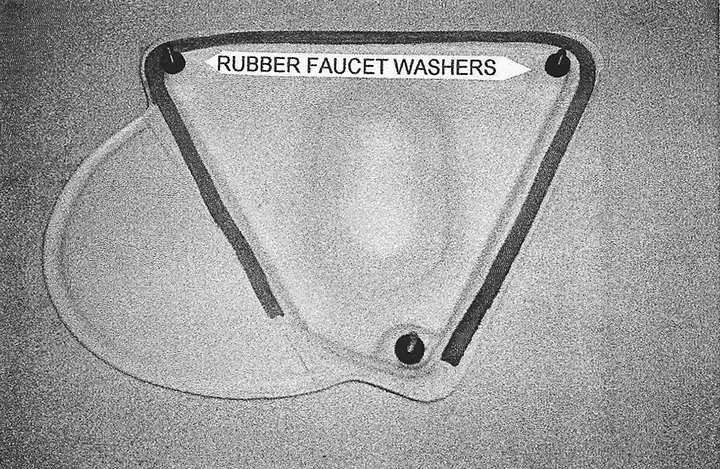
PLASTIC - The front fender is an original Preston Petty LB. (integral base) "Mudder", which is my favorite style of fender from the 70's. The side panels, rear fender, and front number plate are all sourced from H & H KTM. When installing the airbox cover, I push 2 hard rubber faucet washer over each bolt's threads between the cover and the airbox (see photo 3). These fill the extra space in the cover, allowing you to lightly torque the bolts without distorting the cover. They also fit tightly enough on the bolts to retain them to the cover during an air filter change.
I mount the right side panel with "studs" to allow for quick removal. At the front I use a bolt and locknut facing outward in the original mounting hole. At the rear I weld a stud to a large washer which I then place under the rubber exhaust mount.
The front number plate is bolted to one of Karl's stainless steel number plate brackets, which is available from Alan Buehner. Instead of one large o-ring, I use two 3" o-rings to hold the bracket to each fork leg in case of breakage.
SEAT - The seat is the 21" long, tall style built from scratch using Karl's fiberglass seat base, foam, and stainless steel brackets. The seat cover is from Alan Buehner.
FOOTPEGS - The footpegs are Karl's stainless steel cleated pegs, available from Alan Buehner. Because the footpeg mounting holes are typically worn oversize and the footpegs are loose, I drill both the footpeg and mount holes to 3/8" and use a new 3/8" bolt with a shank that is just long enough to fit through both sides of the footpeg. I also like the footpeg to angle upward slightly at the end so I have the welder build up the pad on the top of the footpeg mount and then I grind it to achieve the proper height/angle.
RIMS - We typically use the original Akront "mudcatchers" or original Sun rims. Buchanan's Spoke and Rim in Azusa, CA carries both Akront and Sun rims, as well as a ridged, Akront-looking Excel rim which they claim is stronger and less expensive than the Akront.
SPOKES - Buchanan's manufactures their own spokes, which are available in either steel or stainless steel. They also offer complete wheel building and restoration services if the thought of lacing your own wheels turns you off!
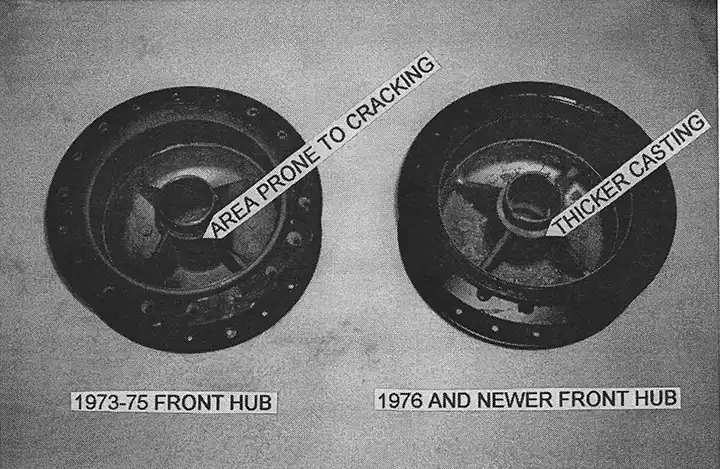
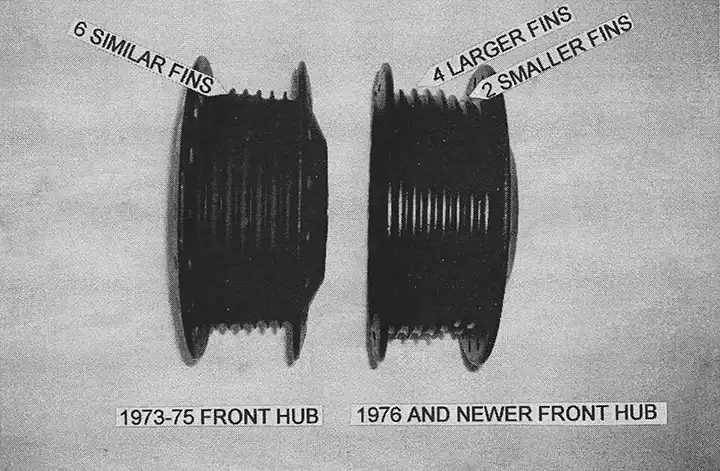
FRONT HUB - There are several options for front hubs and not all of them are good! The aluminum 1972 (and earlier) hub works great. The 1973-75 hub is identical to the earlier aluminum hub, but is cast from magnesium, which turned out to be a mistake. The thin wall section around the steel bearing sleeve worked well with the resilient aluminum, but ended up cracking frequently with the more brittle magnesium. By 1976, the factory rectified this problem by adding more material around the bearing sleeve (see photo 4) and brake lining. These hubs can be readily identified by looking at the fins (see photo 5). The 1973-75 hub has 6 fins of similar diameter while the 1976 hub has 4 fins that are noticeably larger than the other 2 fins.
FRONT BRAKES - The front brake shoes are Ferodo #FSB8 l 4 from H & H KTM. These shoes provide incredible stopping power from drum brakes! I also use the shorter 1975 brake stay, which rotates the hub slightly for better cable alignment (see photo 6), and a Husqvarna cable guide on the fork just above the bottom triple clamp (see photo 1).
At the 2001 ISDTRR, Kevin posted the 3rd fastest overall time in the acceleration/ deceleration test using this brake setup. First and second places were: Dick Burleson and Ray Mungenast on new KTM's!
REAR HUB - The magnesium hub works very well, hut is prone to cracking around the sprocket holes and spoke holes. Keep the spokes and sprocket bolts tight and be sure to check the areas visually before each race.
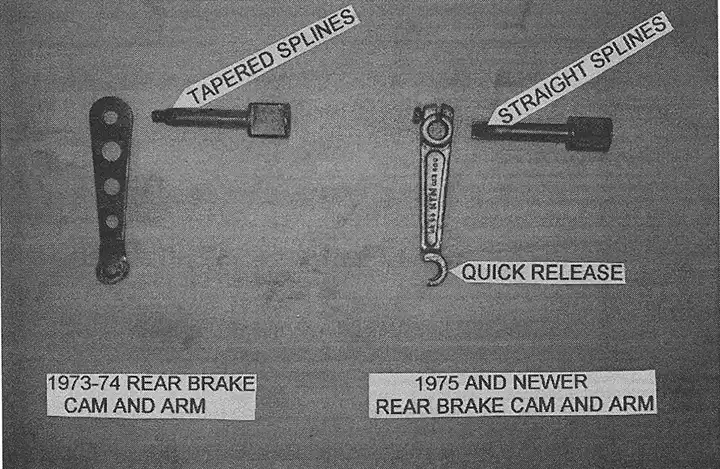
REAR BRAKES - The rear brake shoes are Ferodo #FSB815 from H & H KTM. I also prefer the 1975 (and newer) straight-splined brake cam and quick release brake arm over the 1973-74 conically-splined brake cam and arm (see photo 7). The final touch is one of Karl's brake rods and a steel Monark wingnut from Larry Perkins.
SPROCKETS AND CHAIN - We use a 14 tooth 520 PBI Pro steel front sprocket (#93-14), a 57 tooth 520 PBI aluminum rear sprocket (#5257-57) and a RK SXO 520 o-ring chain. This chain and sprocket combination lasts a full race season for us.
TIRES - We've been very happy with Michelin Ml2 tires on the front (90/90-21) and rear (130/80-18). Although many vintage racers use Michelin S 12 soft terrain tires, we feel that the design and durability of the Michelin M12 medium terrain tires makes them the best all-around choice. Not only do they work well in all conditions, they last a whole season as well! We use Michelin or Moose "Heavy Duty" tubes and, although most of us "normal" riders use 12-13 psi, Kevin prefers 16 psi to prevent pinching.